How to Create Living Wall Art with Ferns in 5 Minutes (No Green Thumb Required)
, by Brian Tant, 6 min reading time
, by Brian Tant, 6 min reading time
Disclaimer: when we say "5 minutes," we're talking about the actual assembly time, not the prep work. Think of it like making instant coffee. Sure, the brewing takes thirty seconds, but somebody had to grow, harvest, and process those beans first. Same deal with fern wall art, except way more fun and infinitely more Instagram-worthy.
Like us, you have probably scrolled past one too many gorgeous living wall displays on social media and thought, "I want that, but I also want to keep my plants alive." Good news, you don't need to be the plant whisperer to pull this off. You just need to be realistic about what "living wall art" actually means and choose the right approach for your skill level.
The truth is, there are two main ways to create fern wall art, and only one of them keeps your ferns actually breathing. Let's start with the easier option that won't judge you if you've accidentally killed a succulent before.
Pressed fern art is basically the gateway drug to plant wall displays. You're working with real ferns, they look absolutely stunning when done right, and the best part? You can't kill them because they're already, well, not alive anymore. Think of it as fern preservation rather than fer-der: you're giving these beauties a second life as art.
The process starts about a week before your five-minute assembly moment. Head outside and collect some ferns from your yard, or if you're apartment-bound, grab a few fronds from your existing fern collection. Fresh Maidenhair ferns work beautifully for this, as do Boston ferns if you want something with more dramatic, flowing lines.
Place each fern frond on a paper towel, cover with another paper towel, and sandwich the whole thing between heavy books. We're talking college textbooks, not paperback novels. The goal is steady, even pressure for about seven days. Set a phone reminder, because trust us, you'll forget.

While your ferns are getting their spa treatment under those books, hit up your local dollar store and grab some simple frames. Nothing fancy: basic black or white frames work perfectly and won't compete with your ferns for attention. You'll also need some spray adhesive, preferably something designed for delicate materials.
When your week is up and your ferns are properly pressed and dried, you're ready for the actual five-minute magic. Remove the glass from your frames, clean it thoroughly (because fingerprints are not part of the aesthetic we're going for), and lay everything out on a clean work surface.
Here's where the creative part kicks in. Each pressed fern has its own personality: some are symmetrical, others have wild, organic shapes. Hold them up against the glass and move them around until you find an arrangement that makes you happy. There's no wrong way to do this, which is refreshing in a world where everything seems to have thirty-seven specific steps for success.
Once you've found your perfect placement, give each fern a light, even coating of spray adhesive and press it gently onto the glass. Work from the center outward to avoid air bubbles, and don't stress if it's not perfectly flat: a little texture adds character.
Reassemble your frame, and congratulations: you've just created botanical art that would make any plant store proud. The whole process from start to finish spans about a week, but the actual hands-on assembly really does take just a few minutes.
Now, if you want your wall art to stay green and growing, we're entering slightly more complex territory. But don't panic: we're not talking about installing an irrigation system or anything that requires power tools.

The simplest living fern wall display starts with choosing the right fern for the job. Staghorn ferns are the absolute champions here because they're naturally epiphytic, meaning they grow on other surfaces in the wild. They're basically designed for this exact purpose, which feels like cheating in the best possible way.
Small Bird's Nest ferns also work wonderfully, as do compact varieties like Ribbon ferns if you want something with more delicate, flowing fronds.
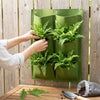
The "five-minute" version of living wall art involves mounting a small fern in a simple wall-mounted planter or small hanging basket. The key is starting with something that's already potted and healthy: this isn't the time to experiment with repotting or root division.
Choose a wall location that gets bright, indirect light. Bathrooms work particularly well because ferns love humidity, and you're probably already in there twice a day anyway to check on things. Mount a simple bracket or hook (following the weight recommendations, obviously), and hang your chosen fern at eye level where you'll actually notice and appreciate it.
The maintenance routine is refreshingly simple. Mist the fronds every few days with a spray bottle, water when the soil feels slightly dry, and rotate the plant occasionally so all sides get equal light exposure. That's it. No special fertilizers, no complicated schedules, no plant apps to track everything.
About that "5 minutes" promise: it's true for the assembly, but there's always setup time. Even the simplest living wall arrangement requires choosing the right spot, installing a proper mounting system, and selecting a fern that's actually suited for your lighting conditions.

The pressed fern route gives you more control over the final look and doesn't require ongoing plant care, which might be exactly what you need if your track record with houseplants resembles a botanical horror story. There's absolutely no shame in this approach: pressed fern art has been a thing for literally centuries, and it looks elegant and timeless.
The living fern approach gives you that satisfaction of caring for something green and growing, plus the bonus of improved air quality and humidity in your space. It's also more forgiving than you might expect: ferns are generally pretty resilient once they're established in a spot they like.
Whether you go the pressed or living route, consider your wall space carefully. A single, well-placed fern piece often has more impact than a cluster of smaller displays. Think about the sight lines in your room and choose a spot where your fern art will be noticed and appreciated, not competing with other wall elements.
Lighting matters more for living arrangements, obviously, but even pressed fern art benefits from being displayed where natural light can bring out the details in the fronds. Avoid direct sunlight for both options: it'll fade pressed ferns over time and can scorch living ones.
The best part about fern wall art, regardless of which approach you choose, is that it brings an organic, natural element into your space without the commitment of a full-scale plant collection. You get the visual benefits of greenery without turning your home into a jungle that requires daily attention.
Your fern wall art project might start as a quick weekend activity, but don't be surprised if it becomes the gateway to a deeper appreciation for these remarkable plants. And if you find yourself wanting to expand your collection, Frond and Fang has a selection of fern varieties that are perfect for both beginners and experienced plant enthusiasts.


